To troubleshoot a Honeywell gas valve, check for gas supply, igniter issues, and valve connections. Proper maintenance is crucial to ensuring safety and efficiency in gas-operated appliances.
Regular inspection and timely repairs can prevent potential hazards and extend the lifespan of the gas valve. Gas valves play a critical role in regulating the flow of gas and ensuring the proper functioning of various devices like water heaters, furnaces, and stoves.
Understanding common issues and troubleshooting steps can help homeowners address problems promptly and avoid costly repairs or replacements. By following manufacturer guidelines and seeking professional assistance when needed, individuals can maintain a safe and reliable gas supply in their homes.
Identifying Common Issues With Honeywell Gas Valves
Troubleshooting Honeywell gas valves involves identifying common issues like pilot light problems and gas leaks. Regular maintenance checks are crucialensuringsure safety and efficient operation of your gas heating system.
If you have a Honeywell gas valve that is malfunctioning, it can be frustrating and potentially dangerous. Gas valves control the flow of gas to your appliances, so it is important to identify any issues as quickly as possible. In this article, we will discuss how to identify common issues with Honeywell gas valves.
Signs Of A Malfunctioning Valve
The first step in troubleshooting a Honeywell gas valve is to identify the signs of a malfunctioning valve. Here are some common signs to look out for:
- Gas smell
- Low or no gas pressure
- Appliance won’t start
- Appliance won’t stay on
- Appliance overheats or underheats
- Gas valve makes a hissing or clicking noise
If you notice any of these signs, it is important to address the issue immediately to prevent any potential hazards.
Typical Symptoms
Once you have identified that your Honeywell gas valve is malfunctioning, it is important to diagnose the specific issue. Here are some typical symptoms that may indicate what is wrong with your valve:
| Issue | Symptom |
|---|---|
| Blocked Valve | Low or no gas pressure |
| Worn Valve | Gas smell or hissing noise |
| Defective Igniter | The appliance won’t start or won’t stay on |
| Thermostat Issues | Appliance overheats or underheats |
If you are unsure about how to diagnose the issue with your Honeywell gas valve, it is recommended to contact a professional for assistance.
In conclusion, it is important to identify any issues with your Honeywell gas valve as quickly as possible to ensure the safety and efficiency of your appliances. By understanding the signs of a malfunctioning valve and typical symptoms, you can troubleshoot and diagnose issues with your Honeywell gas valve with confidence.
Safety First: Precautions Before Troubleshooting
Prior to troubleshooting a Honeywell Gas Valve, prioritize safety by performing necessary precautions. Conduct a thorough inspection and ensure all safety measures are in place before beginning the troubleshooting process. This proactive approach minimizes risks and promotes a safe troubleshooting experience.
Turning Off Gas Supply
Before beginning any troubleshooting, make sure to turn off the gas supply to the valve. This prevents any accidents from occurring.
Ensuring Proper Ventilation
Always check that there is adequate ventilation in the area where you will be working on the gas valve. This helps prevent the build-up of dangerous gases.
Basic Inspection Steps
When troubleshooting issues with a Honeywell gas valve, it’s essential to start with basic inspection steps to identify and resolve common problems. By following a systematic approach, you can quickly pinpoint potential issues and take appropriate action. The following basic inspection steps will guide you through the initial stages of troubleshooting, helping to ensure the proper functioning of your Honeywell gas valve system.
Visual Inspection
Begin by conducting a visual inspection of the Honeywell gas valve and surrounding components. Look for any signs of physical damage, corrosion, or leaks. Inspect the wiring connections for any loose or damaged wires, and ensure that all electrical connections are secure and free from debris. Take note of any unusual odors or sounds emanating from the valve, as these could indicate potential issues that require further investigation.
Checking For Obstructions
Next, check for any obstructions that may be affecting the proper operation of the gas valve. Inspect the gas supply line for any blockages or restrictions, and ensure that the gas pressure is within the specified range for the system. Additionally, check for any debris or foreign objects that may have accumulated in the valve or its surrounding area, as these can impede the flow of gas and lead to performance issues. Clear any obstructions and ensure that the gas valve is free from any impediments that could affect its operation.
Credit: cindymccarty.com
Pilot Light Problems And Solutions
When it comes to your Honeywell gas valve, dealing with pilot light problems can be frustrating. Understanding the common issues and their solutions can help you troubleshoot and resolve these issues effectively.
Relighting The Pilot
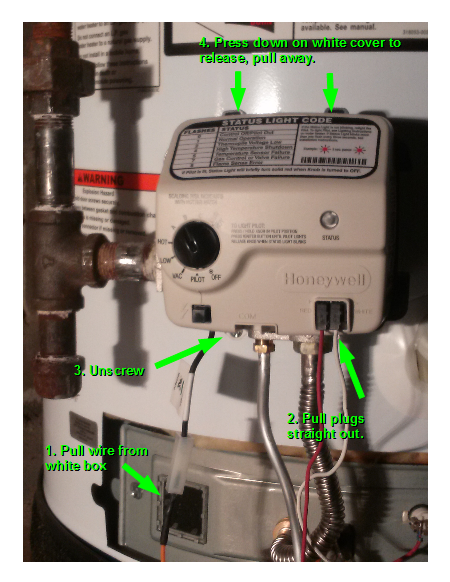
If your pilot light has gone out, it’s crucial to follow the proper steps to relight it. First, ensure that the gas supply to the valve is turned on. Next, locate the pilot valve and set it to the “pilot” position. Then, hold down the reset button while lighting the pilot light with a long lighter. Finally, once the pilot is lit, continue holding the reset button for about one minute to allow the thermocouple to heat up.
Pilot Light Maintenance
Maintaining the pilot light is essential for the proper functioning of your gas valve. Regularly check the pilot assembly for any signs of dirt or debris accumulation. Additionally, ensure that the pilot flame is steady and blue, as a flickering or yellow flame could indicate an issue. Moreover, consider scheduling annual maintenance with a professional to inspect and clean the pilot assembly, ensuring optimal performance.
Dealing With Thermocouple Failures
Testing The Thermocouple
Testing the thermocouple is an essential step in troubleshooting gas valve issues. To do this, start by turning off the gas supply and allowing the thermocouple to cool. Then, detach it from the control valve and use a multimeter to measure its voltage. If the reading is below the specified range, the thermocouple may need replacement.
Replacing The Thermocouple
If the thermocouple fails the voltage test, it’s crucial to replace it promptly. Begin by locating the thermocouple and unscrewing it from the control valve. Then, carefully detach it from the pilot assembly and install the new thermocouple in its place. Ensure proper alignment and secure attachment to prevent future issues.
Credit: tylertork.com
Electrical Issues In Gas Valves
Electrical issues in gas valves can cause disruptions in the operation of the heating system, potentially leading to discomfort and inconvenience. Troubleshooting these electrical problems is crucial for ensuring the proper functioning of Honeywell gas valves. Understanding how to inspect wiring connections and test for electrical continuity can help in identifying and resolving issues efficiently.
Inspecting Wiring Connections
When troubleshooting electrical issues in Honeywell gas valves, start by inspecting the wiring connections. Loose or damaged connections can disrupt the flow of electricity, leading to malfunctions in the gas valve. Ensure that all wiring connections are securely in place and free from any signs of wear or damage. Use a multimeter to check for continuity in the connections and verify that the wiring is properly grounded.
Testing For Electrical Continuity
Testing for electrical continuity is essential to determine if the electrical circuit in the gas valve is intact. Use a multimeter to check for continuity in the wiring and electrical components. By testing the continuity, you can identify any breaks or faults in the electrical pathway, allowing for targeted repairs or replacements to be made. This process helps in ensuring that the electrical components within the gas valve are functioning as intended, enabling the smooth operation of the heating system.
Pressure Adjustments For Optimal Performance
Checking Gas Pressure
Before adjusting, ensure gas pressure is within recommended range.
Adjusting The Pressure Regulator
Use a manometer to adjust gas pressure for efficient operation.
Advanced Troubleshooting Techniques
Discover advanced troubleshooting techniques for resolving issues with Honeywell gas valves efficiently. Identify common problems and apply systematic troubleshooting methods to diagnose and fix gas valve issues effectively. Master the art of troubleshooting to ensure optimal performance and safety of gas appliances.
If you are experiencing issues with your Honeywell gas valve, there are a few advanced troubleshooting techniques you can try before seeking professional help. In this post, we will discuss two important techniques: using diagnostic tools and knowing when to call a professional.
Using Diagnostic Tools
One of the most effective ways to troubleshoot your Honeywell gas valve is by using diagnostic tools. These tools help identify the problem with your valve and provide you with the necessary information to fix it. Here are some of the most commonly used diagnostic tools for Honeywell gas valves:
| Tool | Description |
|---|---|
| Multimeter | A device used to measure electrical current, voltage, and resistance. It can help diagnose issues with the electrical components of your gas valve. |
| Manometer | A device used to measure gas pressure. It can help diagnose issues with the gas supply to your valve. |
| Thermocouple Tester | A device used to test the temperature of the pilot flame. It can help diagnose issues with the pilot light. |
Using these diagnostic tools can help you pinpoint the root cause of the problem with your Honeywell gas valve and take necessary actions to fix it.
When To Seek Professional Help
While using diagnostic tools can be helpful, there are times when it’s best to seek professional help. Here are some signs that indicate you need to call a professional to troubleshoot your Honeywell gas valve:
- If you are not familiar with gas valves and don’t know how to use diagnostic tools.
- If you have tried using diagnostic tools but still can’t identify the problem.
- If you notice any signs of gas leakage, such as a hissing sound or a rotten egg smell.
- If you have tried fixing the issue yourself but still can’t get your Honeywell gas valve to work properly.
Calling a professional can help you avoid further damage to your Honeywell gas valve and ensure that the problem is fixed correctly.
In conclusion, advanced troubleshooting techniques such as using diagnostic tools and knowing when to call a professional can help you fix issues with your Honeywell gas valve. By using these techniques, you can save time and money and ensure that your gas valve works properly for years to come.
Maintenance Tips To Prevent Future Issues
Maintenance plays a crucial role in ensuring the efficient and safe operation of Honeywell gas valves. By adhering to regular maintenance routines and periodic professional inspections, you can prevent potential issues and extend the lifespan of your gas valve system. Here are some essential maintenance tips to prevent future issues:
Regular Cleaning Routines
Regularly cleaning the Honeywell gas valve and its components is essential for preventing potential issues. Use a soft, dry cloth to remove dust and debris from the exterior of the valve. Additionally, clean the pilot assembly and burner to ensure optimal performance. Inspect the vent system for any blockages and clear them if necessary. Always follow the manufacturer’s guidelines for cleaning and maintenance to ensure safe and effective operation.
Periodic Professional Inspections
Periodic professional inspections by qualified technicians are vital for identifying and addressing potential issues before they escalate. Schedule routine inspections to have a professional check for leaks, corrosion, and proper valve operation. Professional inspections can help detect and resolve issues early, preventing costly repairs and ensuring the safety of your gas valve system.

Credit: m.youtube.com
Conclusion: Ensuring Longevity And Efficiency
To ensure the longevity and efficiency of your Honeywell gas valve, regular troubleshooting is crucial. By promptly addressing any issues and conducting routine maintenance, you can enhance the valve’s performance and extend its lifespan. This proactive approach minimizes downtime and promotes the smooth operation of your gas system.
Recap Of Troubleshooting Steps
Step 1: Check for gas leaks with a soapy water solution.
Step 2: Verify the power supply to the gas valve.
Step 3: Inspect the wiring for any damages.
Step 4: Test the valve’s solenoid for proper functioning.
Step 5: Replace the gas valve if necessary.
The Importance Of Timely Repairs
Timely repairs are crucial to prevent further damage and ensure safety.
Neglecting issues can lead to costly repairs or safety hazards.
Regular maintenance enhances the efficiency and longevity of the gas valve.
Frequently Asked Questions
How To Reset the Honeywell Gas Control Valve?
To reset a Honeywell gas control valve, turn off the gas supply and power to the valve, wait five minutes, and then turn the gas and power back on. Press and hold the valve’s reset button for 10 seconds until the light flashes.
Release the button and wait for the valve to reset.
How To Tell If A Gas Valve Is Bad?
A faulty gas valve may show signs like gas odors, pilot light issues, or difficulty in starting the appliance.
Why is My Gas Control Valve Not Working?
The gas control valve may not work due to a faulty electrical connection or a defective solenoid. Check for power supply issues and ensure the valve is not clogged or damaged. Regular maintenance can prevent these issues.
What Is Sensor Failure On Honeywell Gas Valve?
A sensor failure on a Honeywell gas valve can lead to improper functioning or shutdown. It’s crucial to address sensor issues promptly to ensure safe and efficient operation of the gas valve. Regular maintenance and timely sensor replacements can help prevent potential safety hazards.
What Are The Common Issues With Honeywell Gas Valves?
Common issues include pilot light problems, valve leaks, and faulty electrical connections.
Conclusion
In troubleshooting Honeywell gas valves, follow safety guidelines and consult a professional for complex issues. Regular maintenance can prevent problems and ensure optimal performance. By understanding common issues and their solutions, you can effectively troubleshoot and maintain your gas valve system.
Keep your system safe and efficient.